all ·
4 comments
·
Gift Tags: Behind-the-Scenes
I think most people imagine that designers sit around, gazing off into the distance over a steaming coffee (brainstorming, of course) and then gracefully sketch out a masterpiece or design one on their computer (click. click. click. done.) - in an hour or less (naturally). Maybe that is how it works for some, but unfortunately NOT for me.
Since my "day job" is designing invitations for customers, I don't have much time to sit down and develop my own ideas - at least not when they first come to mind. I save my "inspirations" for later in a 3 inch ring binder. It's nothing fancy, but it holds my scraps of paper with sketches, torn magazine pages with color schemes and the like... so when I feel inspired (and actually MAKE myself set aside time), I tackle a new design project from the binder.
I thought it might be fun to share the process of my latest tackle: Gift Tags - so this post is a behind-the-scenes look at the project from start to finish.
The Idea
At the National Stationery Show in May, I was on the lookout for cute enclosure cards or gift tags for the store. They needed to be reasonably priced, but I also wanted them to be fun - not a generic To/From. While I did see a few pretty options (Sugar Paper has some beautiful ones!), none of them fit what I had in my head. On the plane ride home, I began to list the "occasions" one might need an enclosure card/gift tag for, and pretty quickly I had made up my mind to just make them myself.
Sketching, Sketching, Sketching
One weekend, a sliver of unexpected free time presented itself, so I used my list of "occasions" (from the plane) and started sketching ideas that could work for each one. I let my brain run loose with ideas. {Luckily, I draw better on the computer than I do in real life - just look at that Texas - ha! And yes, I usually sketch in pen. I'm weird.}
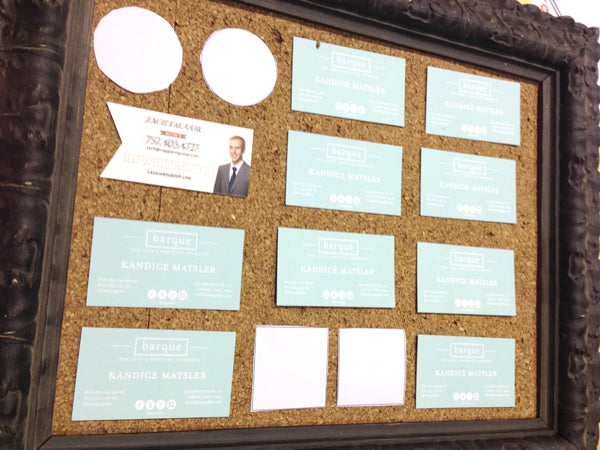
 Considering the Display
From the beginning I knew that I wanted the gift tags to be a convenient, next-to-the-register item, so I needed to choose my display first. I already had this photo frame (11x14) that I thought would work (after I removed the cork in the center), so I tried to figure out how many business card-ish sized tags would fit on it. I didn't want them all to be the exact same shape, so I decided on four different variations - one with straight edges, one with rounded corners, one with a banner shape and one like a mailing tag. By adding a square and round options too, I could also fit two more tags on the board.
Considering the Display
From the beginning I knew that I wanted the gift tags to be a convenient, next-to-the-register item, so I needed to choose my display first. I already had this photo frame (11x14) that I thought would work (after I removed the cork in the center), so I tried to figure out how many business card-ish sized tags would fit on it. I didn't want them all to be the exact same shape, so I decided on four different variations - one with straight edges, one with rounded corners, one with a banner shape and one like a mailing tag. By adding a square and round options too, I could also fit two more tags on the board.
 Design Time
Once I knew how many designs would fit in the display, I used my list of occasions to determine what were the most important to start with - baby, wedding, new home, new dog, hostess, birthday, etc. Using my design sketches for reference, I began to draw them in Adobe Illustrator.
Design Time
Once I knew how many designs would fit in the display, I used my list of occasions to determine what were the most important to start with - baby, wedding, new home, new dog, hostess, birthday, etc. Using my design sketches for reference, I began to draw them in Adobe Illustrator.
 The Finishing Touch
After the designs were finalized, I sent them to press (whew, off my plate). Luckily, the printer already had a die for the banner shaped tag, so I only had to pay for one to be made (the mailing tag). {Did you know? Corner rounding is done on a machine, so a die isn't necessary.} Finally, I was ready to finish the display.
The Finishing Touch
After the designs were finalized, I sent them to press (whew, off my plate). Luckily, the printer already had a die for the banner shaped tag, so I only had to pay for one to be made (the mailing tag). {Did you know? Corner rounding is done on a machine, so a die isn't necessary.} Finally, I was ready to finish the display.
 I had Lowe's cut a board to 11x14 size, then I secured it inside the frame and gave it a nice coat of Annie Sloan Chalk Paint (in Cream). After it was dry, I placed the sample tags on the board again for spacing and hammered finishing nails to make a "peg" for each one.
All Done!
This week, the gift tags arrived from the printer, and I was pretty excited to get them settled in their new home.
I had Lowe's cut a board to 11x14 size, then I secured it inside the frame and gave it a nice coat of Annie Sloan Chalk Paint (in Cream). After it was dry, I placed the sample tags on the board again for spacing and hammered finishing nails to make a "peg" for each one.
All Done!
This week, the gift tags arrived from the printer, and I was pretty excited to get them settled in their new home.
 I'm really pleased with how they turned out, and I think our customers are too! I love that now it's so easy to add a fun tag to a gift - for any occasion (and they're only .99 each). The best part about making them myself is that I can make new designs for every season, event, holiday, or whatever... the possibilities are endless! { By the way, you can't see the back, but the tags do still have TO: and FROM: on them.}
 While this project DID take quite a bit longer than an hour (I'm guessing about 10?), it does feel good to have it OUT of the ideas binder and INTO the store!
Happy gift-giving, friends! I hope you enjoyed this Behind-the-Scenes sneak peek!
Save
While this project DID take quite a bit longer than an hour (I'm guessing about 10?), it does feel good to have it OUT of the ideas binder and INTO the store!
Happy gift-giving, friends! I hope you enjoyed this Behind-the-Scenes sneak peek!
Save
Considering the Display
From the beginning I knew that I wanted the gift tags to be a convenient, next-to-the-register item, so I needed to choose my display first. I already had this photo frame (11x14) that I thought would work (after I removed the cork in the center), so I tried to figure out how many business card-ish sized tags would fit on it. I didn't want them all to be the exact same shape, so I decided on four different variations - one with straight edges, one with rounded corners, one with a banner shape and one like a mailing tag. By adding a square and round options too, I could also fit two more tags on the board.
Design Time
Once I knew how many designs would fit in the display, I used my list of occasions to determine what were the most important to start with - baby, wedding, new home, new dog, hostess, birthday, etc. Using my design sketches for reference, I began to draw them in Adobe Illustrator.
The Finishing Touch
After the designs were finalized, I sent them to press (whew, off my plate). Luckily, the printer already had a die for the banner shaped tag, so I only had to pay for one to be made (the mailing tag). {Did you know? Corner rounding is done on a machine, so a die isn't necessary.} Finally, I was ready to finish the display.
I had Lowe's cut a board to 11x14 size, then I secured it inside the frame and gave it a nice coat of Annie Sloan Chalk Paint (in Cream). After it was dry, I placed the sample tags on the board again for spacing and hammered finishing nails to make a "peg" for each one.
All Done!
This week, the gift tags arrived from the printer, and I was pretty excited to get them settled in their new home.
I'm really pleased with how they turned out, and I think our customers are too! I love that now it's so easy to add a fun tag to a gift - for any occasion (and they're only .99 each). The best part about making them myself is that I can make new designs for every season, event, holiday, or whatever... the possibilities are endless! { By the way, you can't see the back, but the tags do still have TO: and FROM: on them.}
While this project DID take quite a bit longer than an hour (I'm guessing about 10?), it does feel good to have it OUT of the ideas binder and INTO the store!
Happy gift-giving, friends! I hope you enjoyed this Behind-the-Scenes sneak peek!
Save