Jumbo Easter Egg "Bunny" DIY
Which came first, the bunny or the egg? We don't know, but we've been loving the Jumbo Easter Eggs! We did a post on filling them up, but this is a fun way to get crafty with them too.

You'll Need:
- scissors
- a pen
- white and pink felt
- hot glue gun and glue sticks
- pom poms for the nose and tail
- pipe cleaners
- googley eyes (optional)

1. Cut three strips out of the white felt - one about 1" x 4" and two about 2" x 3.5"

2. Use the pen to lightly draw a bunny ear shape on the thicker strips. You'll use this as a guide when you cut them out. Also make sure that the base of your ears has a wedge shape like shown - that's going too keep it in place later.

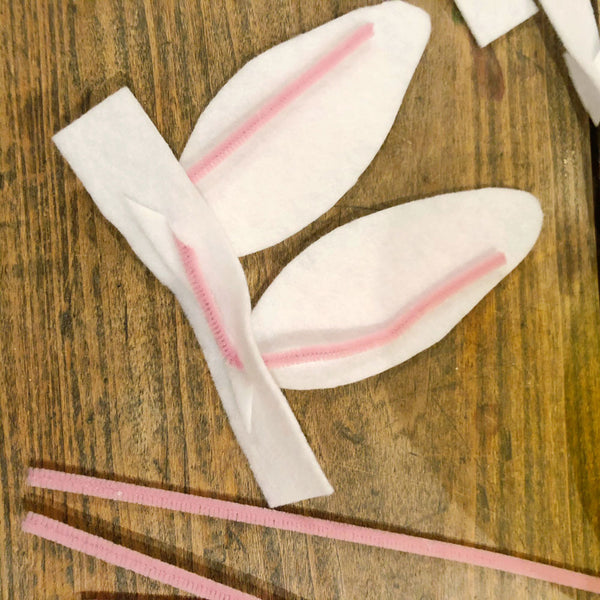
3. You're going to create the base of a bunny "headband" using these three pieces. From here, you'll want to cut two small slits in the flat felt strip.

This is where you will secure the ears. You can play with how far apart they are, just make sure it's far enough that the ears don't overlap.

4. Once the ears are secured into the headband piece, you can cut out pieces of pink felt for the "inside" of the ears.

I just cut out a pink piece the same size as the ear and then trimmed some off all the way around, but you can get creative with how much pink you want to show.

5. Glue the pink felt to the white felt.

6. Flip the bunny headband over and feed a pipe cleaner through the slits in the band. Glue them down to the back of the ears to create stability. White pipe cleaners would look the best, but I only had pink, so that's what I went with.

7. Next, put hot glue on the bottom of the bunny headband and position it on the jumbo Easter egg.

8. Glue a pom pom for the nose and tail, and add googley eyes if you want.

That's it! Now just fill your dressed up Easter egg and it's ready to gift.


